- eCommerce Settings
- Localization
- Import/Export
- API Documentation
- Customizing Your Job Board
- Integrations
- BLOG ARTICLES
- Change Log
- Understanding the HiringOpps Platform
- - Back-Office Admin
- General
Recent Posts
Most Popular


Creating an XML Exporter

XML Exporters enable you to create a formatted document containing job data from your site. This document can then be used to share those jobs to other sites, such as larger job aggregators.
Below, we will outline the process you will need to follow in order to successfully create an XML Exporter in the HiringOpps platform.
If you encounter any issues or have any questions about this document, please contact the support team at support@hiringopps.com.
Creating an XML Exporter
Back-office Admin
- Login as an administrator to your job board.
- Expand the tools section and click Job Exports.
- Click Add Job Export in the top right.
Job Export Editor
You are now in the Job Export Editor window. This page allows you to create new job exports and modify existing job exports.In this section, we will be going through the standard workflow for creating an XML Exporter.
Please see the Editing an XML Exporter article for details on editing an existing XML Exporter.
- Name (required): This is a label for the XML Exporter. This label is only used to identify the exporter within the back-office admin. It is not public facing.
- Affiliate Name (required): The value of this field will be appended to the job url or redirect url in the feed for each job. This value is used to track individual referrals by source.
NOTE: If this feed will be used by someone who is registered as an Affiliate on your job board, the value in this field must be the same as the Affiliate's affiliate ID.
The affiliate ID can be found by logging in as the affiliate and viewing their Affiliate Profile. - Vendor Processors (required): The options you select here determine the structure or format of the final XML file. HiringOpps has the preferred formats of several major aggregators already configured.
If you are unsure of which options to select or if you do not see the Aggregator's format which you need, please contact the HiringOpps support team at suppot@hiringopps.com.
NOTE: An individual file is created for each vendor processor selected here. - Sites (required): Select the sites whose jobs you want to include in this exporter.
NOTE: If you only have one job board site, you will only have one option available in the dropdown menu. Select that option. - Occupations: If you would like to only include jobs categorized under specific Occupations, select those categories here.
If you want to include all Occupations, leave this field blank. - Excluded Occupations: If you would, instead, like to exclude jobs categorized under specific Occupations, select those categories here.
If you do not wish to exclude any specific Occupations, leave this field blank. - Specialties: If you would like to only include jobs categorized under specific Specialties, select those categories here.
If you want to include all Specialties, leave this field blank. - Specialties: If you would like to only include jobs categorized under specific Specialties, select those categories here.
If you want to include all Specialties, leave this field blank. - Work Environments: If you would like to only include jobs associated with specific Work Environments, select those categories here.
If you want to include all Work Environments, leave this field blank.
NOTE: Work Environments are not configured by default with new HiringOpps job boards. If you have not specifically created Work Environments and associated them with Occupations, you will not see any options available in this dropdown menu. - Degrees: If you would like to only include jobs associated with specific Degrees, select those categories here.
If you want to include all Degrees, leave this field blank.
NOTE: Degrees are not configured by default with new HiringOpps job boards. If you have not specifically created Degrees and associated them with Occupations, you will not see any options available in this dropdown menu. - Position Types: If you would like to only include jobs associated with specific Position Types, select those categories here.
If you want to include all Position Types, leave this field blank.
NOTE: Position Types are not configured by default with new HiringOpps job boards. If you have not specifically created Position Types and associated them with Occupations, you will not see any options available in this dropdown menu. - Board Certifications: If you would like to only include jobs associated with specific Board Certifications, select those categories here.
If you want to include all Board Certifications, leave this field blank.
NOTE: Board Certifications are not configured by default with new HiringOpps job boards. If you have not specifically created Board Certifications and associated them with Occupations, you will not see any options available in this dropdown menu. - Experience Level: If you would like to only include jobs associated with specific Experience Levels, select those categories here.
If you want to include all Experience Levels, leave this field blank.
NOTE: Experience Levels are not configured by default with new HiringOpps job boards. If you have not specifically created Experience Levels and associated them with Occupations, you will not see any options available in this dropdown menu. - Companies: If you would like to only include jobs associated with specific Companies, select those Companies by name here.
If you want to include all Companies, leave this field blank. - Excluded Companies: If you would, instead, like to exclude jobs associated with specific Companies, select those here.
If you do not wish to exclude any specific Companies, leave this field blank. - Locations: This field is broken down into three sub-fields: Countries, States, and Cities. You must first select a Country before selecting a State and you must first select a State before selecting a City.
However, if you wish to include jobs from all locations on your job board, leave all three fields unchanged.
- Countries: If you would like to only include jobs associated with specific Countries, select those Countries here.
If you want to include all Countries, leave this field unchanged. - States: If you would like to only include jobs associated with specific States, select those States here.
If you want to include all States, leave this field unchanged. - Cities: If you would like to only include jobs associated with specific Cities, select those Cities here.
If you want to include all Cities, leave this field unchanged.
- Countries: If you would like to only include jobs associated with specific Countries, select those Countries here.
- Company Types: If you would like to only include jobs posted by companies of specific Company Types, select those Company Types by name here.
If you want to include all Company Types, leave this field blank. - Featured Companies: If you would like to only include jobs posted by featured companies, check this box.
Otherwise, leave this box unchecked to include jobs posted by featured companies and regular companies. - Featured Jobs: If you would like to only include jobs that are currently featured, check this box.
Otherwise, leave this box unchecked to include both featured and non-featured jobs. - Posting Methods: When jobs are added to your job board, the HiringOpps system remembers how the job was added (i.e. by XML Importer, CSV importer, or via manual posting).
- If you would like to include only jobs posted by one or two of the above listed methods, select those values from this dropdown menu.
- If you would like to include jobs posted by all methods, select all three options from this dropdown menu.
- Interval (required): Select how often you would like this exporter to update its contents.
Options are every 8, 12, or 24 hours. - Filename Template (required): This field allows you to customize the structure of the filename for your final XML document.
You can use any combination of plain-text and the following variables:%publisher_name%: This evaluates to the name of your job board.%publisher_url%: This evaluates to the URL of your job board.%publisher_id%: This evaluates to your job board ID.
Here is an example from our demo site:
Site ID: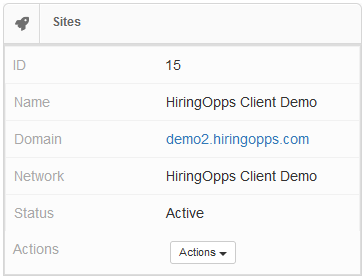
Example XML Export: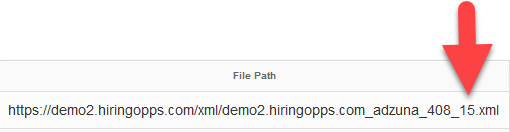
%processor%: The value selected under Vendor Processors above.%export_id%: The unique ID number assigned by the HiringOpps system to this exporter.%affiliate_name%: The value entered under Affiliate Name above.
- Keep Last Log Files (required): Select the number of logs you want to retain from most recently run to oldest run.
This can be any whole number. - Keep Weekly Log Files (required): Select the number of logs you want to retain from most recently run to oldest run this week.
This can be any whole number. - Status (required): Select Active to enable the exporter or Inactive to disable the exporter.
- Include Companies In Danger (required): If this box is checked, ONLY jobs posted by companies whose profile has been marked as "Subscription in Danger" will be included in this export.
- File Limit: Sets the limit on the number of jobs to include in a single XML file.
If the filters configured above match more jobs than the limit set in this field, the system will create additional files to accommodate all jobs (i.e. file_1.xml, file_2.xml, file_3.xml, etc.)
Do not forget to click Submit to save your changes and create your new XML Exporter.
First Run and File URL
Now that your exporter is configured, you may want to run the exporter for the first time to see the contents that will be produced.To run your exporter for the first time:
- From the "Job Exports" page, find the exporter you want to run and click on the Actions dropdown menu.
- Click Run Now.
- You will automatically be taken to the Job Exporter Logs page. The exporter you just ran should be located near the top of the list of logs.
It will show the Status as either "Queued" or "Running" until it finishes, at which point the Status will change to "Finished."
NOTE: The page will not automatically reload as the status of the exporter updates. Please manually refresh the page periodically to see when your exporter is finished running. - Once the Status changes to "Finished", your importer is finished running!
The final output file can be accessed using the URL located under the File Path column.


Comments